Here's this year's Holiday greeting from Mediasauce. Vince, Dan, and I did the white board time-lapse illustration, and Mike and Mitch worked together on the interface.
Click here to watch the greeting.
Wednesday, December 19, 2007
Tuesday, December 18, 2007
Indy Green Tips Tshirt Designs
Here at Mediasauce I was in charge of organizing a day where everyone in the company would devote 5 hrs of service to our community. Everyone worked together to create a PSA of sorts that shares small ways that everyone can work together to help make Indy a greener place. I'll share more about the project once it launches. For now, I'll just share a tshirt design that I put together for it using some of the design elements we created on our day of service.
Click here to see my other t-shirt designs
Tuesday, November 27, 2007
Bookend with Audio
After working with Andy on what I was thinking on the audio, he produced this lovely sound track for the bookend. Dan made the scurry sound for us with a couple pencils on a pad of paper. Well done guys!!!
Wednesday, November 21, 2007
Mediasauce.TV Bookends
I've been working on a little bookend animation for the videos that will be posted on mediasauce.tv The "network" hasn't launched yet, but should sometime within the next couple weeks. Dan created this little tv character that will be used throughout the site. A lot of the videos will be that low fi production feel so I wanted to animate his little character to feel that way as well. I liked the idea of seeing the paper flip and change as the poses changed and gave a slight wiggle to the lines of the tv character to simulate that hand drawn wiggle. (It's a bit hard to see on the small video) I've still got some sound effects and a nice little music track to add. Dan is going to play some snare drum for the music track. I cant wait to get it all together.
Wednesday, September 26, 2007
Lip synch animating with the slide controller in After Effects
The only lip synch animations that I've done, I've done in Flash. I wasn't entirely sure how the workflow would be most efficient in after effects, but here's one that I discovered to be pretty quick and clean. It involves time remapping and a slider control.
1. Bring the ai file of your character in as a composition with all of the different mouth shapes on their own layer.
2. Pre-compose all of the mouth shapes into one composition called "Mouth Shapes". You should now have 2 layers in your main composition. One layer is the composition containing the mouth shapes, and the other is the layer containing everything else.
3. Open the "Mouth Shapes" composition and make the duration of each layer 1 frame. Use Animation presets to stagger the layers end to end so that you have a different mouth shape on every frame of the composition. (Animation>Keyframe Assistant>Sequence layers) Make sure that the "overlap" checkbox is un-checked.
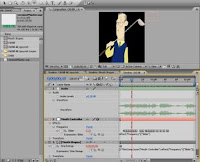
To keep things neat and tidy, change your comp settings to match the number of frames in your comp. ie. if you have 15 mouth shapes, make the comp 15 frames long.
4. Go back out into your main composition. Select the "Mouth Shapes" layer and enable time remapping. (Layer>Time>Enable Time Remapping) Select the time remapping properties under the mouth shapes layer and type the number 3 into the time code contained in that property layer. You should notice that the mouth shape changed to correspond with the mouth shape in frame 3 of your "Mouth Shapes" composition. Set a keyframe in the time remapping property. Be sure to right click on the keyframe and select "Toggle Hold Keyframe" from the menu. This way it will hold on frame 3 of that composition until you set another key frame to change it to a different mouth shape.
5. Now it's time to add slider controls. Delete the key frames that you added to the "Mouth Shapes" layer. The next step is to create a null object that will control the time remapping property of the "Mouth Shapes" composition.
Go to Layer>New>Null Object. Name your new layer "Mouth Controller".
Next, add a slider control to the layer. (Effect>Expression Controls>Slider Control)
Add an expression to the slider control effect that you just added to the "Mouth Controller" layer (Animation>Add Expression).
Now, select the time remapping effect on your "Mouth Shapes" layer and add an expression to it as well.
Add this script to the "Mouth Controller" layer: effect("Frequency")("Slider")
Now add this script to the time remap expression: [1*thisComp.layer("Mouth Controller").effect("Frequency")("Slider")];
You should now be able to go up to the slider controls under "Mouth Controller" and click and hold on the value then move your cursor from left to right and see the mouth shapes change. Add a keyframe to the slider property and dont forget to change it to hold keyframe. Scrub along your audio until you're ready for the mouth shape to change then move the slider again to the new shape you want to use. It should automatically add a key frame for you.
There may be additional tricks to use with this method, and there may be ways to clean it up, but this new technique allowed me to animate a lip synch for my character very quickly. Below is a sample of the animation. The same method could be used for other facial features such as eyebrows, forehead wrinkles, ear wiggles and blinking. The secondary motion of the head, arms, and rest of the body could be added afterwards.
Now I just need to put together a little slider app that does the same thing for flash. :)
(This animation test was done using a character from an American United Life Insurance Company project that we animated that is used to encourage 20 somethings to think about saving for retirement. Special thanks to Vince Gorman and Dave Devries for character design)
Let me know if this tutorial was helpful! I'd love feedback.
Tuesday, September 25, 2007
Sorority Anti-Hazing PSA Illustration
Here's an illustration of a sorority girl that I did for an anti-hazing public service announcement. We do a lot of simple vector-y illustrations here at work because most are used to be animated in flash. It would be fun to drum up some work that allowed us to do illustrations with more texture and depth. For now, we'll just have to work on some of those outside of work.
Sunday, September 23, 2007
Grisette Logo
Recently I've been dabbling in t-shirt screen print design. Mostly I've been putting designs together for specific events, but I also have quite a few little designs that I created just for fun. I thought I might try and take them around to local boutiques to see if there is any interest. I figured I should put them under some sort of name or label, so I decided on the name "Grisette". There were several aspects of the term that appealed to me and seemed to fit with the type of designs that I am producing. Here's a draft of the logo that I'm playing with for the label. Hopefully soon I can put together a few experiments with my own screen here at home. The process is so interesting to me. It'll be a tight squeeze trying to do anything in the bathroom downstairs, but we'll see how it goes. If nothing else, it will give me a fun project to work on once it starts getting cold outside.
Wednesday, September 19, 2007
KeepMyTV.com is Live
Well, the Save My Set site went through a few rounds of revisions and eventually ended up here at KeepMyTv.com. My favorite part of this site was retro fitting the design with the translated headers for the Spanish site. Nice job to Mindy, Spencer, and the rest of the web/interactive team on getting it up and running on a tight deadline.
Oranje 2007
My first experience with Oranje was last Saturday. Mediasauce had booth space so I was there helping to set it up beforehand then worked a shift during the event. Oranje was located in a giant abandoned factory this year so there was a lot of open space to play with. Our booth was made up of giant sheets of viscuine that we stretched over the metal poles that formed its frame. We set up 2 photo scenes inside the booth.
The "play" photo scene that a blue sky scene, sod floor, and random props like sunglasses, wigs, bubbles, windmills, badmitten rackets, and kickballs. The "work" scene contained wood paneling, an old desk, phonebooks, old computers, and construction hats. We would let people back into the scenes 2 at a time, grab their email, then let them pose however they were inspired to pose for 3 photos. The range of inspiration was wide!
Another cool thing about the booth was that the photos that were taken were then projected onto the viscuine so that it could be seen outside the booth. I will have to find photos of the outsde of the booth from someone to share.
I think it was one of the more "interactive" booths at Oranje and a lot of people seemed to have fun with it. On Tuesday we launched a website where people could type in the email address that they gave us to find and download their photos. Nate G did the design for the page as well as the "Work is Play" logo that was projected onto the booth. He was also one of the principle photographers along with Mitch M. and Larry L.
Here are 3 snapshots from our group and one from a practice shot during setup:
.
I had my little video camera with me during setup, it will show you a little more about what the space was like that we had to work with. You will need to have the Divx codec in order to view the movie. I'll have to add photos of the booth all put together later.
Friday, September 14, 2007
Old Pencil Drawings
Another area of the old HD contained a few pencil drawings of my family that I did many moon ago and the tea diffuser I did in metals and jewelry making. The roof is a lid that lifts off so that you can insert the tea leaves, then you place the tea diffuser into an entire pot of tea. The tea diffuses out of the carvings on the side that were made with a very tiny little coping saw.
Here's a more recent sketch I did for an art swap we had at work.
Labels:
illustration,
metalwork,
sketches,
traditional art
Old School Work Archives
Very old Photoshop work. (Photoshop airbrushed illustration of Edgerin James, an airbrushed illustration of a girl viewing the streets of chicago from her car window, a collage design using some photos I'd taken around Lafayette, and a scientific illustration of a garden spider)
Old segment intros I did for a college show I worked on called CG-TV. They were created using Illustrator, 3D Max, and After Effects.
An old flash project I worked on for ITaP one summer. Created the characters and animation using Illustrator and Flash.
Armadillos are fascinating!
Thursday, September 13, 2007
Lebfest '07 T-shirts in Action
Last weekend marked the 2nd annual Lebfest. Around 60 of us gathered in the "Friendly City" of Lebanon, Indiana to celebrate Life, Liberty, and the Pursuit of Friendliness. We gathered beneath the friendly city water tower for opening ceremonies then competed in sports at the park, hung out, challenged each other to ridiculous competitions, and partied until the wee hours of the morning. We split into two teams that honor the two most popular forms of lawn ornamentation embraced by the city, the Porch Geese and the Garden Gnomes. As explained below, the t-shirts were designed to capture the energy and the "fest" aspect of Lebfest, while at the same time highlighting the team mascots and over-all spirit of patriotism that the town of Lebanon (and our beloved festival) prides itself on. Here are some shots of the shirts in action at Lebfest '07.
KeepMyTV.com
Thursday, September 6, 2007
Aquaphobic Octopus or Supersoaker Sniper
Ok.... so the title is a groaner and could use some help, but here's a little colored pencil/sharpie drawing I threw together for an art swap we did here at work. I was in the mood to do something semi-colorful on a nice dark deep colored paper and this is what it evolved into. I love very organic twisty imagery and octopus legs just sort of formed from my squiggles as I was planning it out. Before I knew it I had a very terrified looking octopus and ended up adding the little fishy as his aggressor. The paper was textured, so I decided to work with it and see what kind of result I could get using the textured side. I couldn't quite get the colors of this scan representative of the original, but oh well, close enough.
Everyone who participated in our art swap brought in a piece of art. There was a ton of variety from quilts, to photography, to paintings, to re-purposed ready made art, to quick character sketches. We all drew numbers and swapped based on what we drew. It was a lot of fun, I ended up with a very cool "burner" that Dan did, and Frank Tai got this piece.
Other old sketches.
Friday, August 31, 2007
Speak Easy Invite Illustrations
Earlier this week our illustration/animation team started compiling a bunch of illustrations to put together an illustration reel. I bounce around between so many different things, I had to dig way back for some actual illustration work that I'd done and I came across this old Speak Easy invite that we put together for Suros. Mike Rendel, a fantastic print designer here, put together the layout.
The Penguin Monologues
T-shirt Fun
Over the past couple months I've dabbled in a t-shirt design here and there for various reasons, so I thought I'd include a couple of them in a post. More designs are in the works, maybe some day soon I'll actually put some little label together dedicated to wearable art. I dig t-shirt design, but it would be so fun to put together skirts, purses, etc. Hopefully things should slow down at home soon, and I'll be able to break out my new screen and do some experiments!
1. For The Cure Shirt: A shirt I put together to help raise money for the Leukemia and Lymphoma Society. My purpose for designing this shirt was to create something that I personally would like to wear and hope that others would want to wear it as well. I like the idea of design that can benefit a cause without containing an image of a ribbon or helping hands. (I'm happy to get re-prints made if you are ever in need of a fund raising shirt for this organization. 100% of the profits will ALWAYS go to The Leukemia and Lymphoma Society.)
2. Love is All Shirt: A shirt commissioned by Soul Sister for the Indy Pride festival. They requested a rainbow bullseye and the tagline "Love is All" I wanted to incorporate urban imagery since it was a Downtown Indy festival so I included the buildings and spray paint. I originally had a few prominent buildings from downtown, but I wasn't sure if I should be concerned about the companies that own the buildings since I might be associating those companies with an event without getting permission, so I ended up making the buildings more of a general representation of the city. I also wanted to use very saturated, bright colors that would pop off the shirt and decided to add a bit more interest by breaking up the bullseye. The placement of the buildings and the organic shapes reaching out from behind also implied that the bullseye was a representation of the entire world, re-enforcing the "love is all" tag line.
3. Lebfest '07: This shirt was designed for a mini-event that my friends and I have put together for the last 2 years. The opening ceremonies are held underneath the town's water tower which contains the town's nickname of "The Friendly City". I wanted to play up the "festival" part of Lebfest which drove the general idea behind the design. The geese and gnomes represent the two team names of "Porch Geese" and "Garden Gnomes (which can be found on NUMEROUS porches around the town of Lebanon... lawn ornaments are BIG here).
As a side note, PRN Graphics is a local apparel printing company who I love and trust to get my designs printed. Today I was browsing around their site (because I needed their phone number to call about the Lebfest shirts) and saw that they included my design in their portfolio section. It was surprising to see it on their site. They did a stellar job with the prints and they're really great to work with. If you're in need of a printer, these guys get two thumbs up!
Save My Set!
Animation requests have been a bit slow this week at Mediasauce so I'm helping out the design team with a web mock for Thomson. They're releasing a little converter device for sets that only accept analog signals. The demographic for the website is primarily older individuals who are looking for a way to keep their old tv with the switch of national broadcast signals from analog to digital, so it was important that it seemed friendly, bright, and had large text. It was also important that the majority of the text is html for search engines to spider through. I'll link the site to this post when/if it goes live. Dan Thomson, one of the illustrators I work with did the cute TV cartoon guy, and Dave Devries, another fabulous illustrator, did the comic illustrations in the center of the page.
Thursday, June 28, 2007
Girls Can Draw Too
My friend Vince at work sent me a link to this photo on flickr. Thank goodness there were young men around to lift all those heavy pencils!
Pitching Roster
The last couple days at work I've been working on a layout to help pitch the idea for Roster. Its about hooking up celebrities with fans via xbox live gaming. The website allows fans to watch the the games online in addition to a bunch of other video content that helps bring celebrities closer to the fans. Perhaps fans could write in an ask a question and the celebrity would answer over a video interview, you could watch him give a tour of his home, or sing some karaoke. The idea has room to grow and change, but here's a first run of my layout to help the investors envision it's potential and appeal to the younger generation.
Sometimes I Make Things
Sometimes you have to. Sometimes when you don't, you get grouchy, and depressed, and nothing seems very exciting, and everything seems a little off. Then you make a sketch, or a print, or an animation, or a window box and you feel better, and pretty dumb for not knowing what was wrong after 26 years of the same problem. I'm putting together this blog to remind myself that sometimes I make things. Not always portfolio worthy earth shatteringly awesome things, but things that make me feel whole.
Subscribe to:
Posts (Atom)