The only lip synch animations that I've done, I've done in Flash. I wasn't entirely sure how the workflow would be most efficient in after effects, but here's one that I discovered to be pretty quick and clean. It involves time remapping and a slider control.
1. Bring the ai file of your character in as a composition with all of the different mouth shapes on their own layer.
2. Pre-compose all of the mouth shapes into one composition called "Mouth Shapes". You should now have 2 layers in your main composition. One layer is the composition containing the mouth shapes, and the other is the layer containing everything else.
3. Open the "Mouth Shapes" composition and make the duration of each layer 1 frame. Use Animation presets to stagger the layers end to end so that you have a different mouth shape on every frame of the composition. (Animation>Keyframe Assistant>Sequence layers) Make sure that the "overlap" checkbox is un-checked.
To keep things neat and tidy, change your comp settings to match the number of frames in your comp. ie. if you have 15 mouth shapes, make the comp 15 frames long.
4. Go back out into your main composition. Select the "Mouth Shapes" layer and enable time remapping. (Layer>Time>Enable Time Remapping) Select the time remapping properties under the mouth shapes layer and type the number 3 into the time code contained in that property layer. You should notice that the mouth shape changed to correspond with the mouth shape in frame 3 of your "Mouth Shapes" composition. Set a keyframe in the time remapping property. Be sure to right click on the keyframe and select "Toggle Hold Keyframe" from the menu. This way it will hold on frame 3 of that composition until you set another key frame to change it to a different mouth shape.
5. Now it's time to add slider controls. Delete the key frames that you added to the "Mouth Shapes" layer. The next step is to create a null object that will control the time remapping property of the "Mouth Shapes" composition.
Go to Layer>New>Null Object. Name your new layer "Mouth Controller".
Next, add a slider control to the layer. (Effect>Expression Controls>Slider Control)
Add an expression to the slider control effect that you just added to the "Mouth Controller" layer (Animation>Add Expression).
Now, select the time remapping effect on your "Mouth Shapes" layer and add an expression to it as well.
Add this script to the "Mouth Controller" layer: effect("Frequency")("Slider")
Now add this script to the time remap expression: [1*thisComp.layer("Mouth Controller").effect("Frequency")("Slider")];
You should now be able to go up to the slider controls under "Mouth Controller" and click and hold on the value then move your cursor from left to right and see the mouth shapes change. Add a keyframe to the slider property and dont forget to change it to hold keyframe. Scrub along your audio until you're ready for the mouth shape to change then move the slider again to the new shape you want to use. It should automatically add a key frame for you.
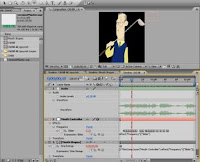
There may be additional tricks to use with this method, and there may be ways to clean it up, but this new technique allowed me to animate a lip synch for my character very quickly. Below is a sample of the animation. The same method could be used for other facial features such as eyebrows, forehead wrinkles, ear wiggles and blinking. The secondary motion of the head, arms, and rest of the body could be added afterwards.
Now I just need to put together a little slider app that does the same thing for flash. :)
(This animation test was done using a character from an
American United Life Insurance Company project that we animated that is used to encourage 20 somethings to think about saving for retirement. Special thanks to
Vince Gorman and
Dave Devries for character design)
Let me know if this tutorial was helpful! I'd love feedback.
 Here's an image of the design I used for the animation. The photos all came from personal travel photos I've taken and the flower designs are the result of some fun with pen and ink. I liked how they turned out and would love to make a funky fabric based on them at some point.


.jpg)